|
|
|
|
|
|
|
|
- Creating a Spreadsheet control in a window
- Creating the control
- Remarks
- Characteristics of Spreadsheet controls in a window
- Spreadsheet control description window
- Initializing the Spreadsheet control in the window editor
- Customizing a Spreadsheet control
- Customizing the toolbar
- Customizing the formula bar
- Customizing the ribbon
Spreadsheet control in a window
Creating a Spreadsheet control in a window Creating the control To create a Spreadsheet control: - On the "Creation" tab, in the "Graphic controls" group, expand "Office" and select "Spreadsheet".
- Click at the desired location to create the control.
Remark: The dimensions of the control are optimized to take up the available space at the specified position. If the control size does not suit you, press Ctrl + Z: the control size will be reset to default. To view the characteristics of the control, select "Description" in the context menu. Remarks - The data displayed by a Spreadsheet control can:
- be defined through programming.
- be entered in the window editor.
- come from a variable. This variable must be a buffer variable and it must et contain the Excel worksheet.
- come from a data file or query. In this case, the item linked to the control can correspond to a memo item containing the desired Excel worksheet.
- A specific AAF menu is automatically associated with the Spreadsheet control. For more details, see Automatic Application Features (AAF) of Spreadsheet controls.
- The maximum values of the Spreadsheet control are:
- 16384 columns.
- 1048576 rows.
- 4096 worksheets.
Characteristics of Spreadsheet controls in a window In the window editor, you can: - describe the different characteristics of the Spreadsheet control via its description window.
- initialize the Spreadsheet control by typing the values found in the different cells.
Spreadsheet control description window The main options of the Spreadsheet control can be defined in the "Details" tab of the control description window. These options are as follows: - Input options:
- Allow the input of values: End users will be able to enter values in the cells of the Spreadsheet control. You can change this option programmatically, using the InputValue property.
- Allow the input of formulas: End users will be able to enter formulas in the cells of the Spreadsheet control. You can change this option programmatically, using the InputFormula property.
- Display options:
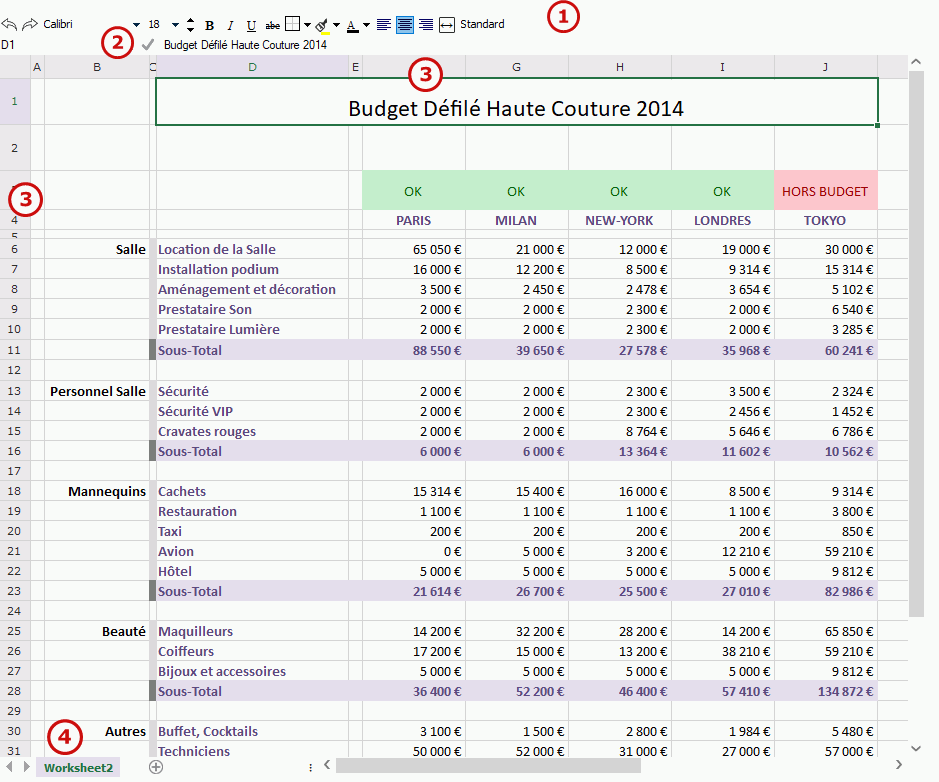
- Display headers of rows and columns (3): The names of the cells are displayed in the Spreadsheet control (letters for the columns, digits for the rows). You can change this option programmatically, using the HeaderVisible property.
- With formula input bar (2): A calculation bar is displayed at the top of control. This bar is used to type formulas. You can change this option programmatically, using the FormulaBarVisible property.
- Toolbar (1): Used to display a toolbar at the top of control. This toolbar is used to format the selected cells. You have the ability to display:
- No bar.
- A toolbar (compatibility with version 22): Displays the menu in toolbar format. You can change this option programmatically, using the ToolbarVisible property. This toolbar can be customized (see Customizing the toolbar).
- A ribbon (by default for a control created from version 23). This ribbon can be customized (see Customizing the ribbon).
- Other parameters:
- Row height: Used to set the height of a row in the worksheet. The "Margins" button allows you to set the cell margins, if necessary.
- Allow multiple worksheets (4): This option is used to manage several worksheets in the Spreadsheet control. The tabs for managing the worksheets are displayed at the bottom left of the Spreadsheet control. A context menu allows the user to manage the worksheets. This option can be modified by the MultiWorksheet property.
 Initializing the Spreadsheet control in the window editor To initialize the Spreadsheet control in the window editor: - Select the Spreadsheet control.
- Click the control twice or open the context menu of the control and select "Edit the content".
- A yellow border appears around the Spreadsheet control to indicate that the control content is in edit.
- Type the different values in the control cells. You have the ability to type values or formulas, to use all the options found in the formatting toolbar or ribbon.
- The values typed are automatically saved with the control.
Customizing a Spreadsheet control Customizing the toolbar To customize the toolbar of the Spreadsheet control, you must use specific internal windows. To customize the toolbar: - On the "Project" tab, in the "Project" group, expand "Import" and select "WINDEV elements and their dependencies".
- Select the "Programs\Data\Preset Windows\EN\AAF" directory.
- Select the windows:
- WinDevAaf_SelBorderPSHEET.wdw: Window used to select the border options for the cells found in the Spreadsheet control.
- WinDevAaf_ColorSel.wdw: Window used to select the color of the font.
- IW_WinDevAaf_BarPSHEET.wdw: Window corresponding to the toolbar.
- Validate.
- Customize the "IW_WinDevAaf_BarPSHEET.wdw" window according to your needs.
Caution: the names of the controls must not be modified.
If the Spreadsheet control uses a toolbar ("With toolbar" option in the "Details" tab of the control description or ToolbarVisible), the custom toolbar will be used. Customizing the formula bar To customize the formula bar, simply re-create it. To create a custom formula bar: - Create two controls:
- A Static control for example, used to view the coordinates of selected cell (or range of cells).
- An edit control used to type the formula.
- Create two buttons:
- A button used to validate the input of formula.
- A button used to cancel the input of formula.
- Programmatically:
- Indicate the role of the first two controls (viewing the coordinates or typing the formula) via SpreadsheetControlFormula. For example:
// -- Initialization code of Spreadsheet control
// Removes the default formula bar
PSHEET_MySpreadsheet.FormulaBarVisible = False
// Defines the control used to view
// the coordinates of selected cell in the Spreadsheet control
SpreadsheetControlFormula(PSHEET_MySpreadsheet, psheetfSelection, STC_Selection)
// Defines the control used to enter the formulas in the Spreadsheet control
SpreadsheetControlFormula(PSHEET_MySpreadsheet, psheetfFormula, EDT_Formula) - Define the actions of these two buttons with AAFExecute. For example:
// -- Click code of button used to validate the formula
// Use of AAFExecute
AAFExecute(PSHEET_MySpreadsheet, aafValidateInputFunc) // -- Click code of button used to cancel the formula
// Use of AAFExecute
AAFExecute(PSHEET_MySpreadsheet, aafCancelInputFunc)
Caution: To use a custom formula bar, the default formula bar must be disabled: - in the editor: "With formula input bar" option in the "Details" tab of the control description.
- programmatically: FormulaBarVisible property.
Customizing the ribbon To customize the ribbon of the Spreadsheet control, you must use specific internal windows. To customize the ribbon: - Go to the "Details" tab in the Spreadsheet control description window.
- In the "Toolbar" area, make sure that the "Ribbon" option is selected. .
- In the "IW source of ribbon" area, select the default preset window.
- The "IW_WINDEVAAF_SpreadsheetRibbon" window is automatically included in your project, in the WDAAF internal component. This internal window (available in English and French) can be modified according to your needs. This window contains all the code required to manage the Spreadsheet control. It is recommended to check for UI errors and make sure the window works properly after any change is made.
Remark: You also have the ability to use an internal window to propose specific ribbon. Any internal window of your project can be used to create this bar.
Related Examples:

|
Unit examples (WINDEV): The Spreadsheet control
[ + ] Using the Spreadsheet control. This example explains how to: - load an xlsx file in a spreadsheet control, - save the spreadsheet in a file, - fill the control with data coming from the database, - insert rows, columns, - access the cells and handle them (modify their value, their style, ...), - enter formulas, - ...
|
|
|
|
|
|
|
|
|
|
|
|
|
|
|
|
|
|
|
|
|