|
|
|
|
|
|
|
|
- Overview
- Creating a template
- How to create a help window template?
- "General" tab
- "HTML Help" tab
- "Layout" tab
Defining a help window template
WINDEV allows you to create help window templates. These templates are used to group all the characteristics of the help window in a single place: HTML characteristics, page color, etc. To use all the characteristics of a help page template, all you have to do is associate the template with the help page ("Layout" tab of the page description). How to create a help window template? To create a new help window template: - On the "Modification" tab, in the "Help system" group, click "Help windows".
- Click the "New" button and specify the name of the window definition.
- Select the options of the template via the different tabs:
- Help system panels and buttons ("General" tab).
- Characteristics specific to help pages compiled in HTML format ("HTML Help" tab).
- The colors used in the page ("Layout" tab).
The general options of a page template are used to define: - the logical name of the template.
- the title of the template window. If this title is specified, this title will be displayed regardless of the title defined in the characteristics of the help page.
- the panels that can be displayed from the page.
- the buttons proposed in the toolbar: These buttons will allow the user to:
- view the previously visited page.
- view all the help options (fonts, ability to make the help always visible, etc.).
- print the current help page.
The options specific to the help system compiled in HTML format (CHM file) are as follows: 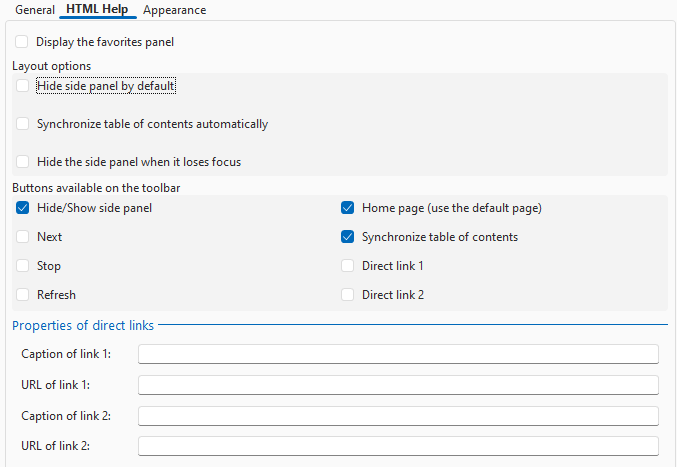 - Display the panel of favorites: The favorites panel allows you to reference the help pages frequently viewed by the user.
- Layout options:
- Side panel hidden by default: Automatically hides all tabs (summary, index, search, etc.): only the toolbar and the page are displayed in the window. A button in the toolbar displays the different tabs.
- Automatic synchronization of table of contents: Automatically synchronizes the summary with the current page in the help. If this page is referenced in the summary, the summary is expanded and the corresponding icon is selected.
- Hide the side panel when it loses focus: Automatically hides all the tabs when the help file loses focus. The tabs are redisplayed as soon as the help regains focus.
- Buttons available on the toolbar:
- Hide/Display the side panel: This button shows or hides the tabs (summary, search, index, etc.).
- Home page : This button is used to display the default page of the help system.
- Next: This button is used to display the next page (according to the defined order).
- Synchronize the table of contents: This button is used to synchronize the table of contents with the current help page.
- Stop: This button stops loading the help page.
- Refresh: This button redisplays the current help page.
- Direct link 1/Direct link 2 : This button opens a website, a specific help page, etc. The properties of these links must be entered (caption and URL).
The "Layout" tab is used to define the color options used in the help pages.
- Header area:
Used to define: - the background color of the header area.
- the background image used for this area.
- the style of the text displayed in this area.
- Main area:
Used to define the background color of text area and/or the background image used for this area. - Positioning:
Used to define the coordinates of the help window (in pixels). The wizard is used to simplify the input of coordinates:- click "Wizard". A window is displayed.
- modify the size and position of this window and validate. The size and coordinates of this window are automatically retrieved.
|
|
|
|
|
|
|
|
|
|
|
|
|
|
|
|
|
|
|
|