|
|
|
|
|
|
|
|
|
|
- Overview
- How to?
- Adding a local project into the Source Code Manager
- Sharing resources
- Automatic file sharing when adding a project
- Share elements between different SCM projects
- Analysis sharing
- Automatic analysis sharing when adding a project
- Sharing an analysis
SCM: Adding a project to the repository
Some operations are required before an existing project can be used by the Source Code Manager. Then, you will be able to work with SCM. Adding a local project into the Source Code Manager To add a local project into the Source Code Manager: - Open your project in the relevant product (WINDEV, WEBDEV or WINDEV Mobile).
- On the "SCM" tab, in the "Add project" group, click "Add project to SCM".
- In the wizard that appears, you can:
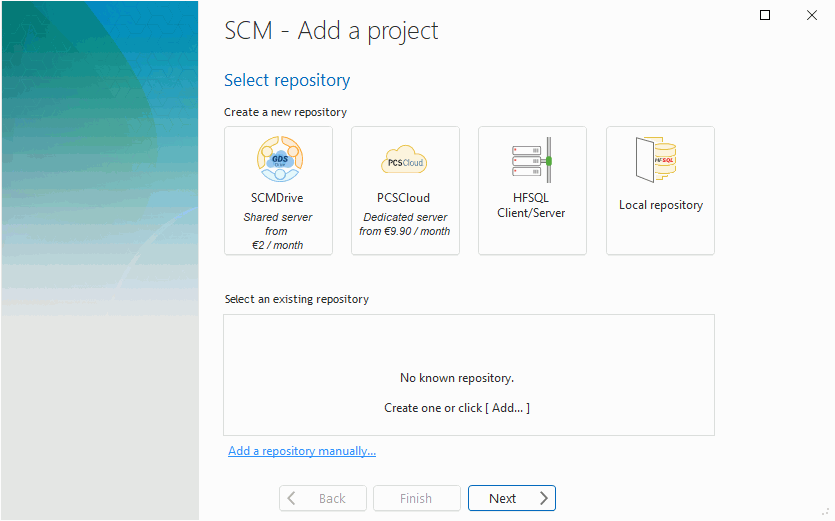 - Create a new repository. Simply select the type of repository you want to create. For more details, see Creating a repository.
- Select an existing repository that has been manipulated. Simply select one of the repositories from the list.
- Use an existing repository that has not been manipulated. Click "Add a repository manually". In this case:
- Select the desired repository and indicate its characteristics. The available repositories are:
- an SCMDrive repository (paid turnkey solution, on a shared server). Enter your SCMDrive login details: email, password and team. For more details on SCMDrive, go to SCMDrive.
- a PCSCloud repository (paid turnkey solution, on a dedicated server). Specify the name of cloud platform used and the project to open. For more details, log in to PCSCloud.
- a repository found on a network share (repository in HFSQL Classic format). Specify the directory of the repository (network computer or shared directory).
- a repository located on an HFSQL Client/Server server. The repository will be in HFSQL Client/Server format. In this case, you need to specify the server, database, port used, and name and password of an HFSQL database administrator.
- In the next step, specify the name of the directory where the project will be located in the repository. By default, the projects are organized according to the product used. Any directory can be specified (the "Remote directory" section can be modified). Go to the next step.
- Select the elements that will be added to the repository. By default, all the project elements are added. Go to the next step.
- The next step allows you to set sharing options:
- If the project uses a shared analysis that is not found in the project directory, the wizard proposes to associate it with an existing SCM analysis, if this analysis has the same name. In this case, the analysis in SCM is automatically shared among the various projects: no additional operation is needed.
- If the project uses elements shared by multiple projects: The wizard suggests the following actions, if these elements are not located in the project directory:
- copy these elements into the project directory.
- share these elements with the corresponding element already located in the SCM. If several elements with the same name are found in the SCM, you have the ability to select the element that will be shared.
- Select (if necessary) the dependencies that will be added to the repository. All the dependencies are added by default. By default, the files found in the "EXE" directory of project are not added. If these files are added, they are checked out for test by default. Go to the next step.
- Validate the addition of the project to the repository.
The developer who added the project into the Source Code Manager becomes the master of the project. Automatic file sharing when adding a project A first project was imported into the Source Code Manager. This project contains elements shared with other projects (classes, windows, procedures, style sheets, etc.). The wizard for project addition proposes to associate the elements already found in the SCM with your project. The following operations explain how resources can be shared among the different projects found in the SCM. Share elements between different SCM projects To share elements (resources) between different projects of SCM: - On the "SCM" tab, in the "Project" group, click "Import from the SCM".
- In the window that appears:
- The "Search" tab is used to search for an element located in the repository by its name.
- The "Browse" tab is used to browse through all the elements located in the repository.
- Select the requested element, then:
- Click the "Share" button to share the selected element.
- Click "Import a copy" to import the element into the project without sharing it.
Important: The dependencies of the element are automatically shared (e.g., internal components of a window) Note: To get the latest versions of shared resources, remember to regularly retrieve the version present in the SCM. Automatic analysis sharing when adding a project You have imported the first project into the SCM. This project contains an analysis shared with other projects. The wizard for project addition proposes to associate an analysis already found in the SCM with your project. No specific operation is required. Sharing an analysis To share an analysis between existing projects: - Import your project A into the SCM (Source Code Manager) as well as its analysis.
- The project B, with which the analysis must be shared, must have no analysis.
- Import this project into the SCM
- Once the project B is imported, display the project description.
- On the "Advanced" tab, click the "Import an analysis from SCM" button.
- Then, you have the ability to copy the analysis or to share it. Click the "Share" button.
This page is also available for…
|
|
|
|
|
|
|
|
|
|
|
|
|
|
|
|
|
|
|
|