|
|
|
|
|
|
|
|
|
|
- Overview
- Managing entry points
- Modifying an entry point
- REST web service description
- Common components
- Prologue procedure
- Authorization
- Generating the OpenAPI documentation
REST web services: Description and features
 Not available Not available
You can edit REST web services created with WINDEV or WEBDEV using the REST web service editor. This editor allows you to: The REST web service editor allows you to: - Create entry points. For more details, see Create entry points.
- Modify an entry point directly from the editor.
- Duplicate an entry point.
- Delete an entry point.
Modifying an entry point You can directly modify all the characteristics of an entry point:
- Entry point description.
- HTTP method: Method representing the action to be performed (GET, PUT, etc.).
- Request format: Format of data passed in the REST call.
- Response format: Format of data retrieved in the response of a REST call.
- Resource or part of the entry point URL.
- Associated procedure: WLanguage procedure associated with the entry point.
- Automatic deserialization: The data passed as parameters to POST, PUT or PATCH requests can be automatically deserialized in a parameter of the procedure associated with the entry point.
 New in version 2025 New in version 2025Scopes: Permissions required to access this entry point.
REST web service description The REST web service description window allows you to configure various elements: To open the REST web service description window, go to the "REST web service" tab, "Options" group, and click "Description". Common components Entry point resources are specified when the entry point is created. The resource is made of: - static elements.
- variables elements.
- common parameters (optional).
The static elements represent the objects used. For example, "/Customers" to handle customers.
In the resource creation wizard, a static element corresponds to a "Fixed component". The variable elements identify the resources used (a customer number, an order number, etc.). For example, "/Customers/{CustNum}" identifies the customer using a customer number. - In the URL creation wizard, a variable element corresponds to:
- a variable component defined by a procedure parameter. This component is automatically retrieved in the parameters of the associated WLanguage procedure.
- a variable component retrieved programmatically with WebserviceParameter.
- A variable element is represented by the following syntax: "{Variable component name}".
For example, "/Customers/10" allows you to manage customers with an identifier set to 10. - It is quite common to pass variables elements in the URL when calling a REST function.
- Each variable component (retrieved programmatically) of the resource corresponds to a parameter passed to the WLanguage procedure associated with the entry point.
- A variable element is represented by a name when defining the address of the entry point in the editor. For a variable component retrieved programmatically, this name must be identical to the name of the parameter in the WLanguage procedure associated with the entry point.
At runtime, the value passed in the resource (URL) will be retrieved and placed in the variable. This name is case sensitive. Therefore, it is very important to use the same name in the procedure and in the resource (or vice versa), otherwise a runtime error occurs.
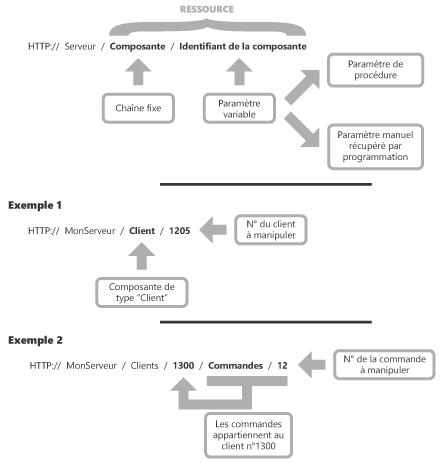 You can combine several static and variable elements. For example: - "/Customers/{CustomerID}/Invoices" to retrieve the invoices of a customer identified by their customer ID.
- "/Suppliers/{SupID}/Products/{ProdRef}" to retrieve the product identified by "ProdRef" for the supplier identified by "SupID".
In the "Common components" tab of the REST webservice description window, you can define a part of the resource that is common to all entry points. Therefore, there is no need to systematically copy this resource section to each entry point. The modification is performed at a single location. Prologue procedure A "Prologue" procedure is called before executing the function associated with the web service entry point (for more details, see Prologue procedure). For example, this type of procedure can be used to check an authentication token during the call to each entry point. The Prologue procedure is a procedure without parameters. This procedure must return:- True to continue and run the procedure associated with the entry point.
- False to stop the call and to avoid running the procedure associated with the entry point. In this case, you must use WebserviceWriteHTTPCode to specify the response status code (4XX or 5XX).
Authorization To use a secure REST web service, you need to define trusted servers and scopes. The "Authorization" tab allows you to: - Defining trusted servers
First of all, you need to enter the details of the user authentication or authorization servers.
To define authentication (OpenID Connect) or authorization (OAuth 2.0) servers: - Click "+" at the top of the window to add as many servers as required.
- Specify the characteristics of each server:
- Server address,
- Token validation key or introspection URL provided by the server. Only one of these elements is required.
 Token validation key (signature verification). The key depends on the signature used by the server: - "HS256"/"HS384"/"HS512" signatures: A secret key is used (shared with the server). The key is a binary value generally in hexadecimal format.
- "RS256"/"RS384"/"RS512" signatures: The server's public key is used. The key is a string. It is generally represented as a multiline text starting with -----BEGIN PUBLIC KEY-----
- Defining scopes
In the lower section of the window, you can enter the list of scopes that may be required to address a web service entry point.
Generating the OpenAPI documentation You can generate the OpenAPI documentation of the REST web service. To do so, go to the "REST web service" tab, "Options" group, click "OpenAPI documentation...", and select the location where you want to generate the corresponding YAML file.
This page is also available for…
|
|
|
|
|
|
|
|
|
|
|
|
|
|
|
|
|
|
|
|